Understanding Diecast Car Paint Stripping
Stripping paint from diecast cars is a popular practice among model car enthusiasts and restorers. It’s the process of removing the existing paint from a diecast model to either repaint it, customize it, or simply refresh its appearance. This guide provides a comprehensive overview of how to strip paint off diecast cars safely and effectively. Whether you’re looking to create a unique custom model or restore a vintage car, understanding the methods and techniques involved is crucial. The process can range from simple chemical applications to more involved mechanical techniques, each with its own advantages and considerations. This guide will walk you through each step, helping you achieve the best results.
Why Strip Paint Off Diecast Cars
There are several compelling reasons to strip paint from diecast cars. One of the most common is to prepare the model for repainting. This allows for customization, such as changing the car’s color, adding detailed graphics, or recreating a specific real-world vehicle. Another reason is to restore older or damaged models. Over time, paint can chip, fade, or get damaged, and removing the old paint is often the first step in bringing the model back to its original glory. Additionally, stripping the paint can be necessary if you want to fix imperfections, like runs or bubbles in the existing paint. Finally, some collectors enjoy the process of detailing and customizing diecast cars as a hobby, and stripping paint is a fundamental part of this activity. The ability to customize and restore can significantly enhance the value and enjoyment of your collection.
Planning Your Paint Stripping Project

Before you begin, proper planning is essential. First, assess the condition of your diecast car and determine the extent of the paint stripping needed. Consider the complexity of the model; intricate details may require more careful methods. Choose a well-ventilated workspace, as many paint stripping chemicals release fumes. Gather all the necessary tools and materials before you start. This includes the chemical stripper or mechanical tools, safety gear, and any additional items for surface preparation. Decide on your desired outcome: are you simply removing the paint, or do you intend to repaint and customize the model? This will influence your choice of stripping method and the level of detail you need to achieve. A well-thought-out plan ensures a smoother, safer, and more successful project.
Tools and Materials You’ll Need
The tools and materials required depend on the stripping method you choose. If using chemical strippers, you’ll need the stripper itself, gloves (nitrile or latex), eye protection, a mask or respirator, and a container to hold the stripper and the model. You may also need soft brushes or cotton swabs to apply the stripper and remove the softened paint. For mechanical methods, you’ll need sandpaper of varying grits, a sanding block, and possibly a rotary tool or media blaster. Additionally, you’ll require items for surface preparation, such as a degreaser, tack cloth, and primer. Always have a supply of clean cloths or paper towels on hand for cleaning. Proper tools and materials not only make the process easier but also ensure a better finish and protect your health.
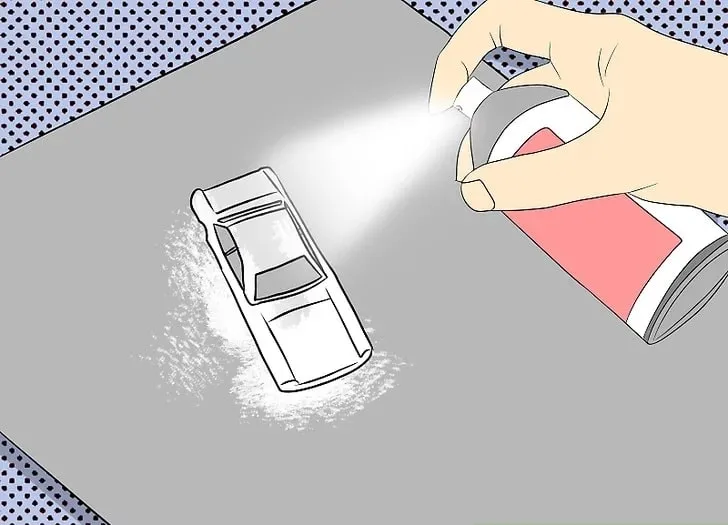
Chemical Paint Strippers
Chemical paint strippers are a popular choice for removing paint from diecast cars due to their effectiveness and relative ease of use. These strippers work by dissolving the paint, making it easier to remove. The most common types include those based on methylene chloride, which is a very effective but often more hazardous option, and those based on citrus or other solvents, which are generally safer but may require longer application times. When selecting a stripper, read the product label carefully to ensure it is suitable for use on diecast metal. Always prioritize safety by choosing a product that minimizes harmful fumes and provides good ventilation. Consider the type of paint on your model, as some strippers are more effective on certain types of paint than others. Carefully review the safety instructions and follow them explicitly to protect yourself and your workspace.
How to Use Chemical Strippers

When using a chemical stripper, start by wearing the appropriate safety gear, including gloves, eye protection, and a mask. Place the diecast car in a well-ventilated area or outdoors. Apply a generous layer of the stripper to the painted surfaces, ensuring complete coverage. Allow the stripper to work for the time specified on the product label; this can vary from a few minutes to several hours, depending on the stripper and the paint. Once the paint has softened and begun to lift, use a soft brush, cotton swab, or a similar tool to gently remove the paint. Avoid using metal tools that could scratch the surface. Rinse the model thoroughly with water or the solvent recommended by the stripper manufacturer to remove any remaining residue. Inspect the car to ensure all paint has been removed and repeat the process if necessary. Finally, clean and prepare the surface for repainting or further customization. Ensure proper disposal of the used stripper and waste materials according to local regulations.
Mechanical Paint Removal Methods
Mechanical paint removal methods involve physically removing the paint using tools like sandpaper, abrasive pads, or media blasters. Sanding is a common technique, involving the use of sandpaper of varying grits to gradually remove the paint. This method requires patience and a steady hand to avoid damaging the underlying metal. Start with a coarser grit to remove the bulk of the paint, and then move to finer grits to smooth the surface. A rotary tool with sanding attachments can speed up the process but requires careful control to prevent gouging. Media blasting uses small abrasive particles propelled at high speeds to strip paint. This is a highly effective method, especially for detailed models, but requires specialized equipment and careful control to avoid damaging delicate parts. Mechanical methods can be labor-intensive but offer precise control and are often preferred for specific customization tasks.
Detailed Sanding Techniques
Sanding is a versatile and accessible mechanical method for stripping paint. Begin by securing the diecast car in a stable position. Start with coarse-grit sandpaper (e.g., 220-grit) to remove the bulk of the paint quickly. Apply light, even pressure and sand in a consistent direction to avoid creating uneven surfaces. Once the majority of the paint is gone, switch to a medium-grit sandpaper (e.g., 400-grit) to smooth out any scratches from the coarser grit. Finally, use fine-grit sandpaper (e.g., 600-grit or higher) to refine the surface, removing any remaining imperfections and preparing the model for priming and painting. Consider using a sanding block to maintain a flat surface and avoid rounding off edges. Sanding can be time-consuming, but with careful attention to detail, it provides excellent control and allows for intricate customization.
Using a Media Blaster

Media blasting offers a powerful and efficient way to strip paint, especially from detailed diecast models. This method uses a stream of abrasive media, such as fine glass beads, sand, or other materials, propelled at high speed to remove paint. It’s essential to have a media blaster unit and a suitable blasting cabinet. When using a media blaster, always wear appropriate safety gear, including a respirator, gloves, and eye protection. Set the air pressure to a suitable level to prevent damage to the diecast model. Hold the model inside the cabinet and direct the media stream evenly across the painted surfaces. The blasting process will quickly remove the paint, revealing the bare metal. Be cautious around delicate details, as the abrasive media can erode fine features. After blasting, thoroughly clean the model to remove any remaining media particles before proceeding with further preparation steps. Media blasting can provide a flawless surface finish, ideal for custom painting.
Testing Your Stripping Method
Before committing to stripping the entire diecast car, it’s a good practice to test your chosen method on a less visible area or on a similar scrap piece if available. This helps you determine if the stripping method is effective and if it causes any damage to the diecast material. Apply the chemical stripper or begin the mechanical process on a small section of the model. Observe how the paint reacts and how easily it is removed. If using chemical strippers, check for any discoloration or damage to the metal. For mechanical methods, evaluate the smoothness of the surface and ensure that no deep scratches or gouges are created. The test will help you refine your technique and determine the appropriate settings (such as grit size or blasting pressure) to use on the entire model. This step can save you time and frustration and ensure that you achieve the desired results with minimal risk of damage.
Preparing the Diecast Car for Paint
Once the paint has been stripped, preparing the diecast car for repainting is crucial for achieving a professional finish. This involves thoroughly cleaning the model to remove any residue from the stripping process. Use a degreaser to eliminate any oils or contaminants that might interfere with paint adhesion. Inspect the surface for imperfections, such as scratches or minor dents, and address them with fine-grit sandpaper or body filler as needed. Prime the model with a suitable primer designed for metal surfaces. The primer provides a base for the paint to adhere to, promotes even coverage, and helps to fill any remaining minor imperfections. Ensure the primer is fully dry before applying the paint. A properly prepared surface is key to a smooth, durable, and visually appealing finish.
Cleaning and Surface Preparation

Cleaning and surface preparation are critical steps in the paint stripping process, regardless of the method used. After stripping, the diecast car will likely have residue from the stripper or abrasive media. Use a degreaser or a mild soap solution to remove any oils, dirt, or chemicals that can prevent proper paint adhesion. Rinse the model thoroughly with water and allow it to dry completely. Inspect the surface for any imperfections, such as scratches, dents, or rough spots. Use fine-grit sandpaper to smooth out any minor imperfections, followed by a tack cloth to remove any dust particles. Ensure the surface is completely clean, dry, and smooth before applying primer. Proper cleaning and preparation will create a perfect surface for the primer to bond to, increasing the paint’s longevity and quality. This will result in a professional-looking finish and enhance the overall appearance of the diecast car.
Safety Precautions
Safety is paramount when stripping paint from diecast cars. Always wear appropriate safety gear, including gloves, eye protection, and a mask or respirator. Chemical strippers often contain harmful chemicals, and mechanical methods can generate dust and debris. Work in a well-ventilated area, preferably outdoors or in a space with good airflow. Read and follow the safety instructions provided by the manufacturer of the chemical stripper. Avoid contact with skin and eyes, and in case of contact, rinse immediately with plenty of water. When sanding or blasting, wear a dust mask or respirator to prevent inhalation of particles. Properly dispose of used chemicals and waste materials according to local regulations. A safe work environment ensures that you can enjoy your hobby without risking your health.
Protecting Yourself and Your Workspace
Protecting yourself and your workspace involves several precautions to ensure a safe and productive environment. Always wear appropriate personal protective equipment (PPE), including gloves made of a material resistant to the chemicals used (nitrile or latex are common), safety glasses or goggles, and a respirator or mask to prevent inhalation of harmful fumes or dust. Protect your workspace by covering surfaces with drop cloths or plastic sheeting to catch spills and overspray. If using chemical strippers, make sure your workspace is well-ventilated to dissipate fumes. Ensure good lighting to see the details of your work. Have a first-aid kit readily available in case of any minor accidents or exposure to chemicals. By taking these precautions, you can minimize the risk of accidents and exposure to hazardous materials, creating a safe and pleasant environment for your paint stripping projects.
Troubleshooting Common Problems

Common problems encountered during paint stripping include stubborn paint, damage to the diecast metal, and an uneven finish. If the paint is not coming off easily with chemical strippers, try applying a second coat or using a different stripper specifically designed for the type of paint on your model. For mechanical methods, ensure you’re using the correct grit of sandpaper or the right pressure with the media blaster. If the metal is damaged, such as by deep scratches or gouges, you can try to smooth the surface with body filler and sanding, although this might require more advanced techniques. An uneven finish can often be corrected by using finer grit sandpaper or carefully controlling the application of the stripper. Troubleshooting requires patience and an understanding of the different techniques involved. Don’t be afraid to experiment and adjust your methods until you achieve the desired result.
Dealing with Stubborn Paint
Sometimes, paint can be particularly stubborn to remove. This can be due to the type of paint used, the age of the model, or the condition of the original paint job. If you’re facing stubborn paint, try a few different approaches. First, ensure you’re using a stripper that’s suitable for the type of paint you’re removing. Allow the stripper to soak for a longer period; sometimes, patience is key. Gently agitate the paint with a soft brush or cotton swab to help the stripper penetrate and lift the paint. If the paint remains resistant, you might need to combine methods, using chemical strippers followed by careful mechanical abrasion with sandpaper or a gentle abrasive pad. Avoid using excessive force, which can damage the metal. If necessary, consult online forums or expert advice for further guidance on dealing with particularly challenging paint jobs. Persistence and the right techniques will eventually help you overcome even the most stubborn paint.
Final Touches and Next Steps
Once you’ve successfully stripped the paint, cleaned the surface, and addressed any imperfections, the next steps involve preparing the model for repainting or customization. This includes applying a primer to create a base for the paint to adhere to. Choose a primer that is compatible with the metal of the diecast car and the type of paint you plan to use. After the primer has dried completely, sand it lightly with fine-grit sandpaper to create a smooth surface. Then, you can begin the painting process. Select your desired paint color and apply multiple thin coats, allowing each coat to dry before applying the next. After the paint has dried, you can add details such as decals, clear coats, and other embellishments to complete your project. The final touches can transform your diecast model into a unique and personalized piece.