Customizing diecast cars is a rewarding hobby that combines creativity, craftsmanship, and a passion for automobiles. Whether you’re a seasoned modeler or a complete beginner, this step-by-step guide will walk you through the process of transforming ordinary diecast models into personalized masterpieces. From choosing the right model to applying the finishing touches, we’ll cover everything you need to know to get started and create stunning custom diecast cars. Get ready to unleash your inner artist and bring your automotive dreams to life in miniature form. Customizing diecast cars is more than just a hobby; it’s an opportunity to express your creativity and build a collection of unique, personalized models. Let’s dive in and explore the exciting world of diecast customization!
What are Diecast Cars and Why Customize Them?
Diecast cars are miniature replicas of real-life vehicles, typically made from metal alloy, often zinc. These models are known for their durability, intricate details, and collectability. The appeal of diecast cars extends beyond mere aesthetics; they offer a tangible connection to the automotive world and a canvas for creative expression. Customizing diecast cars allows enthusiasts to modify these models to their liking, creating unique pieces that reflect their personal style and interests. The possibilities are endless, from simple paint jobs and decal applications to extensive modifications, such as engine swaps and interior customizations.
Types of Diecast Cars to Customize
When choosing a diecast car to customize, you have a wide variety of options. Different models cater to different tastes and skill levels. Consider the make, model, and scale of the car. Popular choices include classic cars, modern sports cars, trucks, and even race cars. The selection of a car for customizing often depends on personal preference and the specific project goals. Some enthusiasts prefer to work on familiar models, while others seek out rare or unusual vehicles to create truly unique customs. It’s also crucial to select a car that is readily available in the chosen scale and easy to disassemble for customization.
Scale of Diecast Cars

Diecast cars come in various scales, the most common being 1:18, 1:24, and 1:64. The scale refers to the ratio between the model’s size and the size of the real-life vehicle. 1:18 scale models are larger and more detailed, making them ideal for intricate customization projects. 1:24 scale is a popular middle ground, offering a good balance of detail and size. 1:64 scale, also known as the ‘Hot Wheels’ size, is more affordable and easier to store, making it perfect for beginners. The choice of scale impacts the level of detail you can achieve and the complexity of the customization process. (Image: diecast-car-scales.webp)
Materials Used in Diecast Cars
Diecast cars are predominantly made from diecast metal, which provides durability and allows for fine detailing. Other materials include plastic for the interior, tires, and sometimes the chassis. Windows are typically made of clear plastic. The combination of materials adds to the realism and allows for different customization options. Knowing the materials used helps in selecting the right tools and techniques for modification, such as choosing appropriate paints and adhesives. Metal components require different preparation and painting methods than plastic parts, so understanding the materials is crucial for successful customization.
Essential Tools and Materials for Customization
Before starting your customization journey, gather the necessary tools and materials. Having the right equipment will make the process smoother and ensure better results. From basic hand tools to specialized supplies, each item plays a crucial role in transforming a standard diecast model. The investment in high-quality tools and materials will pay off in the long run, enabling you to create professional-looking custom cars. Proper preparation and the use of suitable materials are key to achieving a flawless finish and durable custom design.
Tools

Essential tools include a small screwdriver set, hobby knife, pliers, tweezers, and sandpaper. A cutting mat protects your work surface. For more advanced projects, you might need a rotary tool (Dremel), airbrush, and various clamps. Precision is key, so consider investing in quality tools. These tools will be used throughout the customization process, from disassembly to the final detailing stages. (Image: tools-for-custom-diecast.webp)
Materials
Materials include primer, paints (acrylic or enamel), clear coat, decals, putty or filler, and various adhesives. Use high-quality paints and clear coats for a durable and attractive finish. Different types of paint offer varying levels of detail and durability. Decals add intricate designs and markings, while putty and filler are used to correct imperfections. Adhesives will be used in the reassembly phase. Always wear a respirator and work in a well-ventilated area when using paints and chemicals.
Step 1 Preparing Your Diecast Car for Customization
The first step in customizing your diecast car is preparation. This process involves disassembling the model, stripping the paint, and preparing the surface for new paint and modifications. Proper preparation ensures that your custom work looks great and lasts. Skipping these steps will result in a poor finish and potentially damage your model. Take your time, be careful, and pay attention to detail during the preparation phase for the best results.
Disassembly

Carefully disassemble your diecast car using a small screwdriver and hobby knife. Take photos as you go to remember how parts fit together. Remove wheels, interior, windows, and any other parts that are not permanently fixed. Be gentle to avoid damaging any components. A careful approach will prevent breaking any delicate parts. Organized disassembly ensures easy reassembly later on. (Image: disassembling-diecast-car.webp)
Stripping the Paint
Remove the existing paint using paint stripper or by soaking the body in isopropyl alcohol. Follow the manufacturer’s instructions carefully. Use a toothbrush or soft brush to remove all the paint. Ensure all paint is removed before moving on. Wear gloves and eye protection when working with chemicals. Paint stripping is necessary for the new paint to adhere properly and to allow you to start with a clean surface.
Sanding and Priming
Once the paint is removed, sand the surface with fine-grit sandpaper to smooth any imperfections. Apply a thin coat of primer to the body and any other parts you plan to paint. Allow the primer to dry completely before proceeding. Priming helps the paint adhere and provides a consistent base. Multiple thin coats of primer work better than one thick coat. Fine sanding between coats is crucial for a smooth finish.
Step 2 Painting and Detailing Your Diecast Car

Painting and detailing are where your creativity shines. From choosing the right colors to applying intricate graphics, this step allows you to give your custom diecast car its unique personality. Whether you’re aiming for a realistic replica or a bold, creative design, this stage is crucial for bringing your vision to life. Take your time, use quality paints and techniques, and enjoy the process of creating your masterpiece.
Choosing Your Colors
Select colors that match your vision for the custom diecast. Consider the car’s model and your personal preferences. Research color schemes and inspiration from real-life vehicles. Use acrylic or enamel paints designed for model cars. Ensure the colors complement each other and align with the overall design. Consider the level of gloss, matte, or metallic finish you want. (Image: painting-diecast-car.webp)
Painting Techniques
Use an airbrush or spray cans for even paint application. Apply thin, multiple coats instead of one thick coat to avoid runs or drips. Let each coat dry completely before applying the next one. Maintain a consistent distance from the model. Practice on scrap pieces first to master the technique. For detailed work, consider using masking tape to create sharp lines and separate colors.
Applying Decals and Graphics

Decals add intricate details and graphics to your custom diecast. Cut out the decals carefully and apply them to the painted surface using water. Smooth out any bubbles or wrinkles. Once dry, seal the decals with a clear coat to protect them. Consider using aftermarket decals or custom-printed decals. Decals can significantly enhance the realism and visual appeal of your model. Clear coat will protect decals and provide a glossy finish.
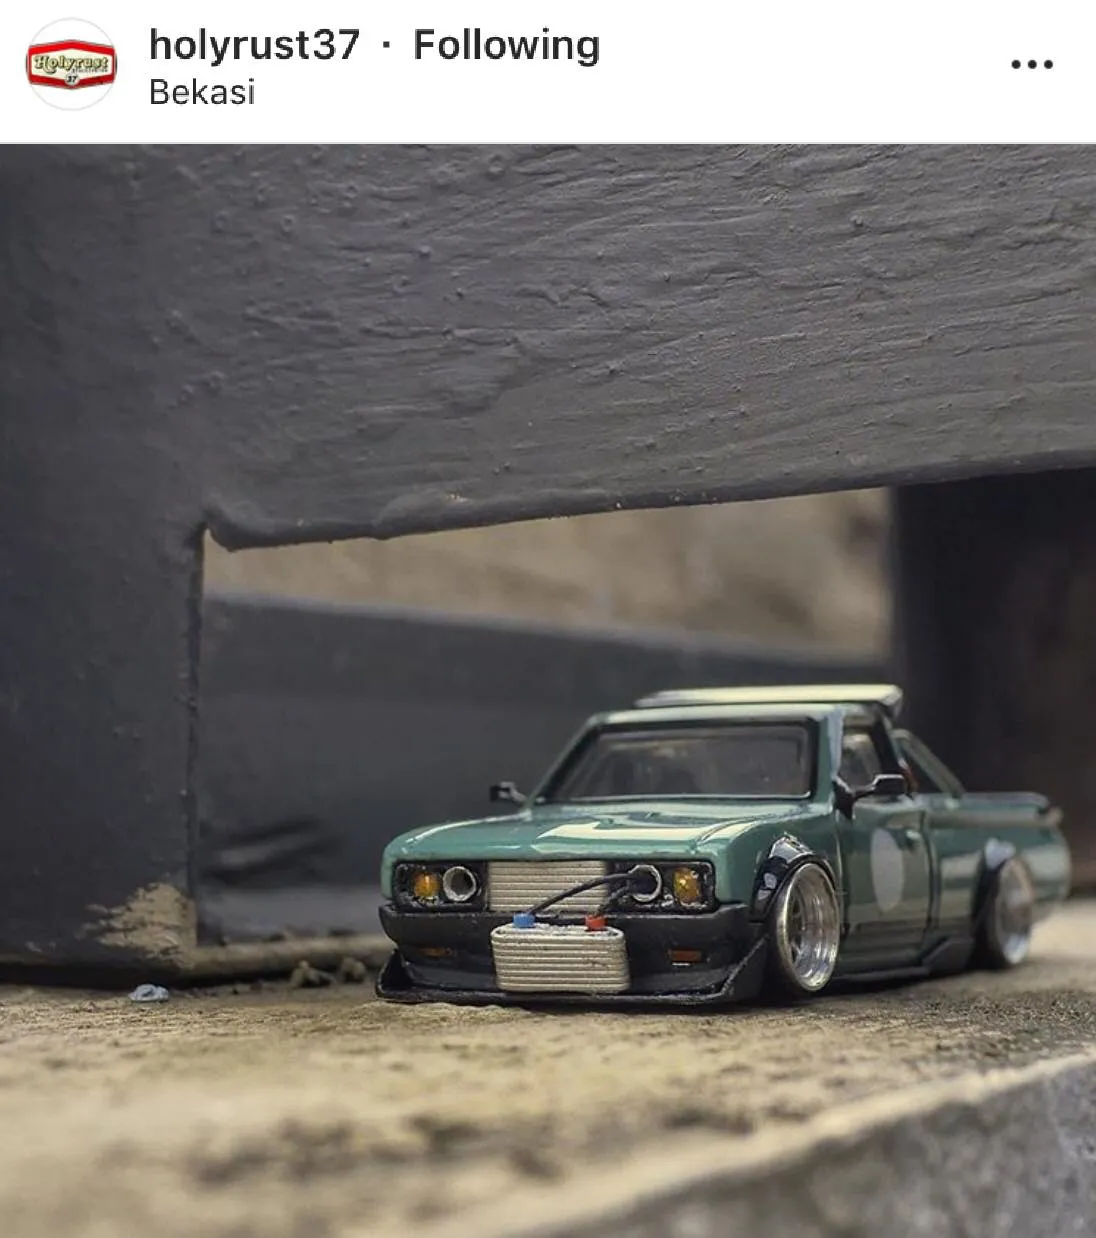
Step 3 Modifying and Adding Custom Features
This step focuses on adding custom features to your diecast car. Whether it’s swapping wheels, customizing the interior, or adding exterior modifications, this is where you can truly make your model unique. From subtle changes to more significant alterations, these modifications are the key to personalization. This stage calls for careful planning, precision, and a creative approach to bring your vision to life.
Wheel Swaps
Wheel swaps can dramatically change the look of your diecast. Choose wheels from other models or aftermarket sources. You may need to modify the axles or chassis to fit. Ensure the new wheels rotate freely without rubbing against the body. Wheel swaps is a great way to personalize your model. (Image: custom-diecast-wheels.webp)
Interior Customization

Detail the interior with paint, decals, and other materials. Add custom seats, dashboards, or roll cages. Use small tools and fine brushes for detailed work. Interior customization greatly enhances the overall realism. Modifying the interior is an opportunity to enhance the level of detail and create a more realistic appearance.
Exterior Modifications
Add spoilers, body kits, or other custom parts to enhance the car’s appearance. Use putty or filler to smooth out seams and imperfections. Consider adding custom lights or other details. Exterior modifications can change the overall look of the car. Use appropriate adhesives for durable results. Exterior changes are often a great way to add unique personal touches.
Step 4 Reassembling and Finishing Your Custom Diecast
The final step in the process is reassembling your model and applying any finishing touches. Careful reassembly, ensuring that all parts fit correctly, is essential to your finished diecast car. Finishing touches are where you can create a truly professional-looking model. This step is where all of your hard work comes together. Take your time and enjoy the final transformation.
Reassembly Tips

Carefully reassemble all parts you disassembled, referring to your photos for guidance. Use appropriate adhesives to secure parts. Ensure all parts fit correctly without any gaps. Check for any loose components. Slow, careful reassembly ensures a polished finish. (Image: reassembling-diecast-car.webp)
Final Touches and Detailing
Add any final details, such as weathering effects, panel lines, or clear coats. Use a clear coat to protect the paint and decals. Apply any final weathering techniques to add realism. These final steps will bring your diecast car to life. Consider adding some final touches, like polishing the windows or applying a final clear coat. (Image: finished-custom-diecast.webp)
Where to Buy Supplies and Find Inspiration
Find supplies and inspiration from various sources. Online retailers and custom diecast communities are great places to start. Research and find other models to get inspiration. There are numerous sources for supplies, ideas, and support. Discovering these resources will greatly enhance your customization journey and provide endless opportunities.
Online Retailers
Numerous online retailers sell diecast cars, paints, tools, and decals. Explore websites like eBay, Amazon, and specialty hobby stores. Compare prices and read reviews before making a purchase. Many online retailers offer tutorials and how-to guides. Consider joining forums and online groups for more inspiration.
Custom Diecast Communities
Join custom diecast car communities online or locally. Share your work, ask for advice, and find inspiration from other enthusiasts. Participate in forums, social media groups, and local modeling clubs. These communities provide a wealth of knowledge and support. Engaging with other customizers can fuel your passion and creativity.
Customizing diecast cars is an enjoyable and rewarding hobby that offers endless opportunities for creativity and skill development. By following these steps, you can create unique and personalized models that reflect your passion for cars. Enjoy the process, experiment with different techniques, and continue to learn and grow as a customizer. Happy customizing, and enjoy the journey of transforming these miniature vehicles into works of art!