
What is Diecast Model Photography
Diecast model photography is a captivating niche that combines the art of photography with the precision and detail of miniature scale models. It involves capturing the intricate designs and realistic features of diecast cars, trucks, and other vehicles through the lens. This specialized field requires a blend of technical skills, artistic vision, and a keen eye for detail to create stunning and eye-catching images. It’s not just about taking a picture; it’s about crafting a scene, telling a story, and showcasing the beauty of these miniature masterpieces. Whether you are a seasoned photographer or a complete beginner, this guide will help you understand the fundamentals and techniques needed to excel in the world of diecast model photography, transforming your hobby into a visual art form.
Essential Equipment for Diecast Model Photography
To embark on your diecast model photography journey, you’ll need some essential equipment to get started. While professional setups can be elaborate, you can achieve great results with a basic kit. The core components include a camera (a DSLR or mirrorless camera is recommended), a macro lens (for capturing fine details), a sturdy tripod (to eliminate camera shake), and a lighting setup (either natural light or artificial lights). Additionally, consider a neutral background, props to enhance the scene, and a remote shutter release to minimize vibrations. Having a well-rounded kit will allow you to experiment with different techniques and styles, eventually leading to high-quality photographs that truly showcase your diecast models. Do not worry if you do not have all of these items; you can start with what you have and upgrade as you go.
Camera Selection

The camera you choose plays a vital role in the quality of your diecast model photography. While smartphones can capture decent images, a DSLR or mirrorless camera offers far greater control and image quality. Look for a camera with manual settings, allowing you to adjust aperture, shutter speed, and ISO. This control is crucial for achieving the desired depth of field and lighting effects. Consider cameras with high megapixel counts for detailed shots, and good low-light performance. Brands like Canon, Nikon, Sony, and Fujifilm offer excellent options for both beginner and advanced photographers. The ability to shoot in RAW format is also a significant advantage, as it provides more flexibility during post-processing.
Lens Choices
The right lens can make or break your diecast model photos. A macro lens is highly recommended, as it allows you to get incredibly close to the models and capture intricate details such as the paint, trim, and interior features. Macro lenses typically offer a 1:1 magnification ratio, meaning the image on the sensor is the same size as the subject. If a macro lens isn’t available, a lens with a close focusing distance can still work. Prime lenses (lenses with a fixed focal length) are often preferred for their sharpness and clarity. Popular focal lengths for diecast photography include 50mm, 60mm, and 100mm macro lenses. Experiment with different lenses to see which ones best suit your style and the models you are photographing.
Tripod and Stabilization
A sturdy tripod is a must-have for diecast model photography. It eliminates camera shake, especially when using slow shutter speeds or shooting in low light. A tripod allows you to maintain consistent composition and focus, which is essential for sharp, detailed images. When selecting a tripod, consider its weight capacity, height, and stability. Look for features like a ball head or a three-way head for flexible positioning. A remote shutter release or a camera’s self-timer is also beneficial, as it prevents any vibrations caused by pressing the shutter button. This will help you achieve the sharpest possible results, highlighting every detail of your models.
Lighting Techniques for Diecast Models

Lighting is perhaps the most critical aspect of diecast model photography. Proper lighting can transform a good photo into a great one, enhancing the textures, colors, and details of your models. The key is to control and manipulate the light to create the desired effect. This can be achieved through various techniques, including the use of natural light, artificial light sources, or a combination of both. Soft light is generally preferred, as it minimizes harsh shadows and highlights. Experimenting with different lighting setups and angles will help you create stunning images that showcase your models in the best possible way.
Natural Light vs. Artificial Light
Natural light offers a simple and often beautiful solution for diecast model photography. The best times to shoot with natural light are during the golden hours – shortly after sunrise and before sunset – when the light is soft and warm. Position your models near a window, but avoid direct sunlight, which can create harsh shadows. Overcast days are also ideal, as the clouds act as a natural diffuser, providing soft, even lighting. Artificial light, on the other hand, gives you greater control over the lighting conditions. You can use continuous lights (like LED panels) or flash units with softboxes or umbrellas to soften the light. Experiment with different lighting setups, such as side lighting, backlighting, and rim lighting, to achieve various effects.
Setting up Your Shot
Setting up your shot involves more than just placing the model in front of the camera; it’s about creating a scene that tells a story. Start by choosing a background that complements your model. A simple, clean background will help to make the model the focal point, while a more elaborate setup can add context and visual interest. Pay attention to the position of your model. Consider the angle, perspective, and composition of the shot. Experiment with different viewpoints to find the most appealing angles. Adjust the lighting to highlight the model’s features and create the desired mood. Remember to take your time and make small adjustments until you achieve the perfect shot.
Background and Props

The background plays a significant role in setting the scene and enhancing your diecast model photos. A simple background, such as a sheet of paper or a seamless backdrop, can be effective in highlighting the model’s details. Alternatively, you can use a more elaborate setup, such as a diorama, to create a more realistic environment. Consider using props, such as miniature figures, trees, or street signs, to add depth and visual interest. Ensure that the background and props complement the model without distracting from it. The choice of background and props should align with the theme and story you want to convey. A well-chosen background can significantly enhance the overall appeal and professionalism of your photos.
Composition Techniques
Mastering composition is key to creating visually appealing diecast model photos. The rule of thirds is a fundamental principle in photography; imagine dividing your frame into nine equal parts with two horizontal and two vertical lines. Place key elements, such as the model, along these lines or at their intersections to create a balanced and engaging composition. Leading lines, such as roads or fences, can draw the viewer’s eye into the frame, adding depth and perspective. Experiment with different angles and viewpoints to find the most dynamic and interesting compositions. Pay attention to symmetry and asymmetry, and use these principles to create visual harmony and balance in your photos. Practice and experimentation will help you develop your compositional skills.
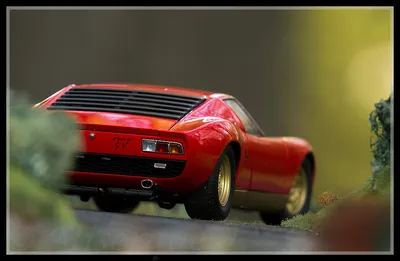
Focusing and Depth of Field
Focusing and depth of field are crucial for achieving sharp, detailed images. Depth of field refers to the range of distance in a scene that appears acceptably sharp. A shallow depth of field (achieved with a wide aperture like f/2.8 or f/4) can blur the background, making the model the focal point. A deeper depth of field (achieved with a smaller aperture like f/8 or f/16) keeps more of the scene in focus, which can be ideal for showing a diorama setting. When focusing, ensure that the most important parts of the model are sharp. Use the camera’s autofocus or manually focus to get the details just right. Experiment with different apertures to control the depth of field and create the desired effect.
Post-Processing Your Diecast Model Photos

Post-processing is an essential part of the diecast model photography workflow, where you can enhance your images and correct any imperfections. Editing software such as Adobe Lightroom, Photoshop, or free alternatives like GIMP allows you to adjust exposure, contrast, colors, and sharpness. You can also remove dust spots, correct lens distortions, and apply various artistic effects. The goal of post-processing is to bring out the best in your photos and enhance their visual appeal. However, avoid over-editing; the goal is to make your photos look natural and realistic. With practice, you can master post-processing techniques to create stunning images that showcase your diecast models beautifully.
Basic Editing Software
Basic editing software is designed for photographers with all levels of experience. Many of these programs offer user-friendly interfaces and a wide range of features. Key adjustments typically include exposure, contrast, highlights, shadows, whites, blacks, clarity, vibrance, and saturation. You can also adjust the color balance, crop and straighten your images, and apply basic sharpening and noise reduction. Free options, like GIMP or Darktable, are great for beginners. If you want to step up your game, Adobe Lightroom is a popular choice for its intuitive interface and powerful editing capabilities. These programs offer a range of tools for adjusting the overall look and feel of your images.
Advanced Editing Techniques
Advanced editing techniques take your photos to the next level. Techniques to explore are: precise color grading, selective adjustments, and retouching. Color grading involves adjusting the colors to create a specific mood or style. Selective adjustments allow you to edit only certain parts of the image, such as brightening a shadow or enhancing a specific color. Retouching involves removing imperfections like dust spots and scratches. Learn to use layers and masks for non-destructive editing. Advanced software like Photoshop allows for more complex manipulations, such as replacing backgrounds or adding special effects. Advanced editing can significantly enhance the quality and visual impact of your photos. Start with simple adjustments and gradually learn more complex techniques as your skills improve.
Common Beginner Mistakes and How to Avoid Them
Beginners often make some common mistakes in diecast model photography. One mistake is using the wrong lighting, leading to harsh shadows or blown-out highlights. Fix this by using soft light sources and experimenting with different angles. Another mistake is neglecting the background, resulting in a cluttered or distracting scene. The solution is to choose a simple, complementary background or to blur the background using a shallow depth of field. Over-editing is also a common issue. Avoid excessive adjustments and aim for a natural look. Finally, not paying enough attention to detail can ruin an otherwise good photo. Ensure the model is clean, in focus, and properly positioned. By being mindful of these common pitfalls, you can significantly improve the quality of your photos.
Overcoming Lighting Challenges
Lighting can be a challenge, but understanding how to overcome these issues is key. Harsh lighting is often the biggest obstacle, which can be tackled by using soft light sources. If shooting outdoors, find a shaded area or shoot on an overcast day. Indoors, use diffusers or softboxes to soften the light from your light source. Dealing with reflections is another common problem; use polarizing filters or adjust the angle of the light source to minimize unwanted reflections. Finally, when working with artificial lights, adjust the power and position of the light sources to achieve the desired effect. Practice and experimentation with different lighting setups will help you overcome these challenges.
Achieving Realistic Reflections
Achieving realistic reflections in your diecast model photography can add depth and realism to your photos. The first step is to use a reflective surface, such as a polished table, a sheet of glass, or a mirror. Position the model on the surface so that it reflects. Adjust the lighting to create the reflections. Using a soft light source will help to create smooth, natural-looking reflections. Experiment with the angle of the light source to control the appearance of the reflections. Post-processing can further enhance the reflections. Adjust the contrast and brightness in the reflections to make them more pronounced. By understanding the principles of reflection and practicing your technique, you can create stunning, realistic images.
Resources for Further Learning

There are many resources available to help you improve your diecast model photography skills. Online tutorials, YouTube channels, and photography forums provide valuable guidance and inspiration. Books and magazines dedicated to photography can offer in-depth knowledge and technical information. Social media platforms, like Instagram and Flickr, are excellent places to find inspiration and connect with other diecast model photographers. Join photography clubs or workshops to learn from experienced photographers and get feedback on your work. Remember, practice is key. The more you shoot, the better you will become at capturing stunning images of your diecast models.
In conclusion, diecast model photography is a rewarding and enjoyable hobby that allows you to combine your passion for photography with your love for miniature models. By following the guidelines and techniques outlined in this guide, you can learn the fundamentals and develop your skills to create captivating and professional-quality images. Remember to experiment, practice, and most importantly, have fun. The world of diecast model photography is vast and full of creative possibilities, so embrace the journey and enjoy the process of bringing your miniature masterpieces to life through the art of photography.