Airbrushing metal diecast cars is a rewarding hobby, allowing you to achieve stunning, professional-looking finishes on your miniature vehicles. However, success relies heavily on using the right techniques and materials. This guide provides seven essential tips to help you master the art of airbrushing your diecast car collection, from selecting the perfect paint to applying the final clear coat, ensuring a flawless and durable finish. Whether you’re a beginner or looking to refine your skills, these tips will elevate your diecast car painting to the next level and create miniature masterpieces.
Choosing the Right Airbrush Paint
The foundation of a great paint job is the right paint. Several types of paints are available for airbrushing diecast cars, each with its own properties and benefits. Understanding these differences is crucial for achieving your desired results. Factors such as durability, finish, and ease of use should guide your decision. Consider the level of detail you intend to achieve and the overall look you’re aiming for when making your selection. Experimenting with different paint types can help you find the perfect match for your projects and desired aesthetic. Choosing the correct type of airbrush paint will make your paint job much more enjoyable.
Paint Types for Diecast Cars
Several paint types are suitable for airbrushing diecast cars. Each has its strengths and weaknesses. The choice often comes down to personal preference, the desired finish, and the level of experience of the painter. Always ensure the paint is compatible with the primer and clear coat you intend to use. Proper ventilation and safety precautions are essential when working with any type of paint. Consider the drying time, durability, and ease of cleanup when making your choice. Understanding the differences between paint types will allow you to select the best choice for your diecast project.
Acrylic Paints for Diecast Cars
Acrylic paints are water-based, making them easy to clean and relatively low-odor. They dry quickly and are generally safe to use, making them a good choice for beginners. Acrylics offer a wide range of colors and can be thinned with water or acrylic-specific thinners. However, they may not be as durable as other paint types and can be prone to chipping. When airbrushing acrylics, multiple thin coats are recommended to avoid clogging the airbrush and to ensure a smooth finish. Consider using a primer specifically designed for acrylics to improve adhesion and durability. Furthermore, some acrylics have excellent self-leveling properties, reducing the need for extensive polishing.
Enamel Paints for Diecast Cars
Enamel paints offer excellent durability and a high-gloss finish. They are oil-based and require solvents for thinning and cleaning. Enamels take longer to dry than acrylics, allowing more time for adjustments and corrections. They are known for their resistance to chipping and scratching, making them a good choice for frequently handled diecast cars. However, enamel paints tend to have a strong odor and require proper ventilation. They also may require a longer curing time before clear coating. Always follow the manufacturer’s instructions for thinning and application to achieve the best results. When using enamel, multiple thin coats are always recommended.
Lacquer Paints for Diecast Cars
Lacquer paints are known for their fast drying times and exceptional finishes. They are solvent-based and provide a very hard and durable surface. Lacquers offer a wide range of colors and finishes, including metallic and pearlescent effects. However, they can be more challenging to work with, requiring more experience and precision. Lacquers have a strong odor and necessitate excellent ventilation. They can also be more sensitive to environmental conditions. Proper safety equipment, including a respirator, is essential when airbrushing lacquer paints. Additionally, lacquer paints may react with some primers or clear coats, so always check compatibility before use.
Airbrush Equipment Essentials

Having the right equipment is critical for successful airbrushing. This includes a quality airbrush, a reliable air compressor, and all the necessary accessories. Investing in good equipment will make the painting process much easier and produce better results. Consider the size of the projects you’ll be working on and choose equipment that meets your needs. Proper maintenance and cleaning of your equipment are essential to ensure longevity and optimal performance. Furthermore, having backup parts, such as needles and nozzles, can prevent delays in your projects.
Airbrush Compressor
A reliable air compressor is essential for consistent airflow and pressure. Choose a compressor that provides adequate pressure for your airbrush. Look for features such as an air regulator, moisture trap, and automatic shut-off. The air regulator allows you to control the pressure, while the moisture trap prevents water from contaminating the paint. A quiet compressor is highly recommended, especially if you work in a shared space. Consider a compressor with a tank, as this will provide a more consistent airflow. Make sure to regularly drain the moisture from the tank to maintain optimal performance. A good compressor will make a big difference in your airbrushing experience.
Airbrush
The airbrush is the heart of the process. There are different types of airbrushes, including single-action and double-action. Double-action airbrushes are more versatile, allowing you to control both paint flow and air pressure independently. Choose an airbrush with a fine nozzle for detailed work. Consider the ease of cleaning and maintenance when selecting your airbrush. Practice with your airbrush before starting your project to become familiar with its operation. Ensure you have spare parts, such as needles and nozzles, on hand. Maintaining and cleaning your airbrush after each use will keep it working optimally and prevent clogs. Selecting the correct airbrush is vital.
Paint Mixing and Thinning Techniques

Proper paint mixing and thinning are vital for achieving a smooth, even finish. The consistency of the paint is critical for preventing clogs and ensuring proper atomization. Always refer to the paint manufacturer’s recommendations for thinning ratios. Experiment with different ratios to find what works best for your airbrush and paint type. Using the correct thinner is also important, as using the wrong thinner can negatively affect the paint’s drying time and adhesion. Accurate mixing and thinning will make a significant difference in the final appearance of your diecast cars. Furthermore, ensuring you mix the paint thoroughly is an important step.
Mixing Ratios for Airbrushing
The mixing ratio of paint to thinner depends on the paint type and the desired effect. Start with the manufacturer’s recommendations, which are usually provided on the paint container. As a general rule, thinner should constitute between 10-50% of the mixture. For fine detail work, a thinner mixture is often needed. For larger areas, you might use a slightly thicker mixture. It’s best to mix small batches of paint at a time to avoid waste. Always mix the paint thoroughly to ensure the color is consistent. Using a paint mixing stick will help ensure uniform paint distribution. Keep notes of the ratios you use and your results, so you can replicate successful mixes in the future.
Thinning Paints for Best Results
Thinning your paints correctly is crucial for achieving a smooth and even finish. Using the right thinner is as important as using the right paint. The thinner should be compatible with the paint type you are using. For example, use acrylic thinner for acrylic paints, enamel thinner for enamel paints, and lacquer thinner for lacquer paints. Thin the paint in small increments, adding thinner a little at a time, until you reach the desired consistency. The ideal consistency is usually described as the consistency of milk or skim milk. Test the paint by spraying it onto a piece of scrap material to ensure the paint atomizes properly and doesn’t spatter. Correct thinning will result in a smoother and more professional-looking finish.
Surface Preparation for Airbrushing

Preparing the surface of your diecast car is one of the most critical steps in the airbrushing process. Thorough preparation ensures that the paint adheres properly and that you achieve a smooth, even finish. Neglecting this step can lead to paint peeling, bubbling, or an uneven appearance. Proper surface preparation involves cleaning, degreasing, and priming the model. Patience and attention to detail in this stage will pay off in the long run, resulting in a professional-looking finish. Preparing your diecast car is worth the time and effort.
Cleaning and Degreasing the Diecast Car
Before you begin painting, thoroughly clean and degrease the diecast car. This removes any dirt, grease, or oils that could prevent the paint from adhering properly. Use warm, soapy water and a soft brush to wash the model. Rinse it thoroughly and allow it to dry completely. You can also use a degreasing agent, such as isopropyl alcohol, to remove any remaining residue. Avoid using harsh chemicals that could damage the model. Ensure every surface is clean and free of any contaminants. A clean surface is the foundation for a successful paint job.
Priming the Diecast Car
Priming the diecast car is an essential step to ensure the paint adheres properly and creates a uniform surface for the color coats. Primer helps to fill in minor imperfections, providing a smoother base for the paint. Choose a primer that is compatible with the paint you intend to use. Apply the primer in thin, even coats. Avoid applying too much primer at once, which could lead to runs or drips. Allow the primer to dry completely before sanding lightly with fine-grit sandpaper to remove any imperfections. Priming will improve the final appearance and durability of the paint job, and should be done before any painting process.
Airbrushing Techniques

Mastering airbrushing techniques involves understanding how to control the airbrush and apply paint evenly. Practice is essential for developing your skills. Experiment with different techniques to achieve various effects. Learning the basics of airbrushing, such as applying base coats and layering paint, is critical. Proper technique will allow you to create stunning effects on your diecast cars. Taking your time with your airbrushing is key to producing a professional finish. Understanding and practicing these methods will lead to better results.
Applying the Base Coat
The base coat is the foundation of your paint job. Apply thin, even coats of paint, building up the color gradually. Hold the airbrush perpendicular to the surface and move it in a smooth, consistent motion. Avoid spraying too much paint at once, as this can lead to runs and drips. Multiple thin coats are always better than a single thick coat. Allow each coat to dry completely before applying the next coat. The number of coats will depend on the paint type and desired coverage. A good base coat provides a solid foundation for further detailing and finishing touches. Ensuring each coat is correctly and smoothly applied is vital.
Layering the Paint
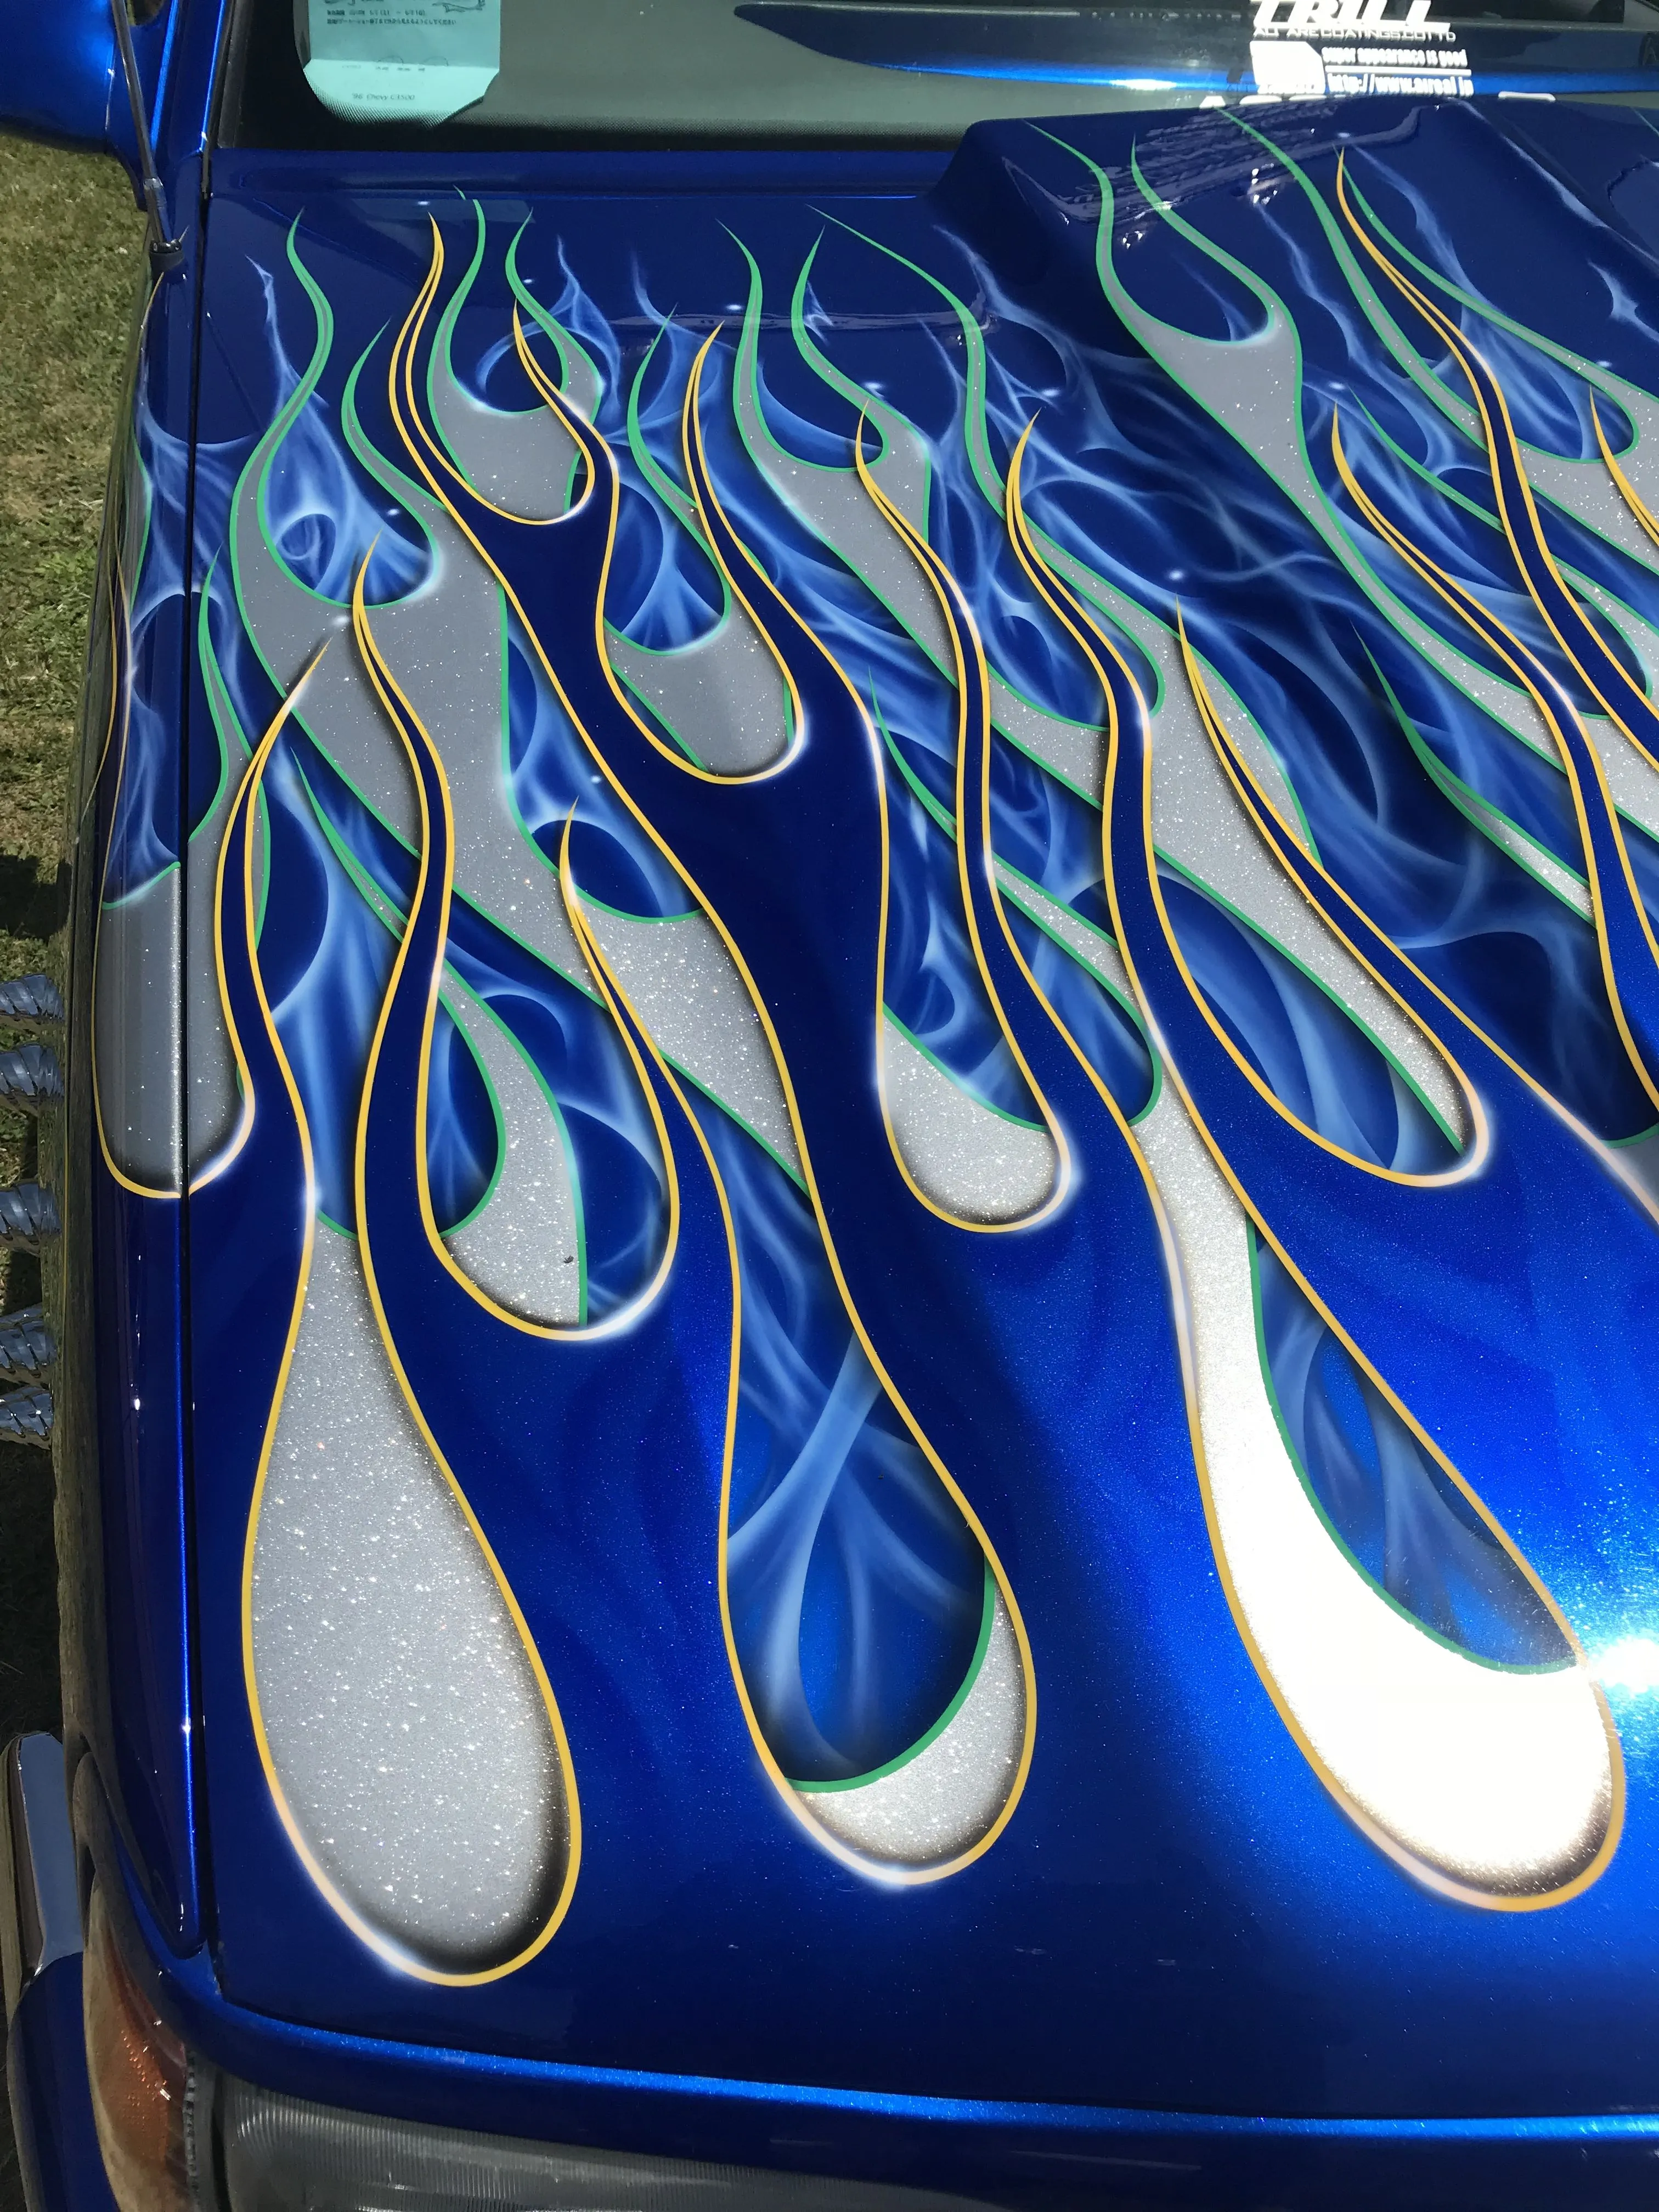
Layering paint involves applying multiple thin coats of paint to achieve depth, highlights, and shading. This technique is essential for creating a realistic and professional-looking finish. Use different colors and techniques to create the desired effects. For example, you might use a lighter shade to highlight raised areas or a darker shade to create shadows. Practice blending and fading techniques to create seamless transitions between colors. Layering is not just for color, but also for clear coats, or applying a gloss or matte finish. Layering will increase the level of detail in your paint job, resulting in a more realistic and stunning effect.
Avoiding Common Airbrushing Mistakes

Avoiding common mistakes is essential for achieving a professional-looking finish. Common problems include paint runs, orange peel, and other imperfections. Identifying and correcting these mistakes requires practice and attention to detail. Proper preparation, technique, and equipment maintenance can help prevent these issues. Understanding the causes of these mistakes and how to avoid them will improve the quality of your work. Always be patient and take your time to achieve the best results, as it takes patience and dedication.
Paint Runs and Sags
Paint runs and sags occur when too much paint is applied at once, or when the paint is too thin. To prevent these, apply thin coats of paint and avoid spraying too much paint in one area. Ensure the air pressure is correct and the airbrush is clean. If you notice a run or sag, allow the paint to dry completely, then lightly sand the area before reapplying paint. Adjust your technique and thinning ratio. The application of thin layers is always best, as it can prevent this issue. Remember to take your time and apply the paint in thin layers to prevent this.
Orange Peel Effect
The orange peel effect is characterized by a textured, uneven surface that looks like the skin of an orange. This is often caused by improper air pressure, incorrect thinning ratios, or applying paint from too far away. To avoid this, ensure the air pressure is correct and the paint is properly thinned. Maintain the correct distance between the airbrush and the surface. Apply the paint in thin, even coats. If the orange peel effect occurs, allow the paint to dry completely, then lightly sand the surface before reapplying paint. Adjusting the paint or air pressure is also key to solving this problem. Furthermore, the type of thinner you use can also contribute to this effect, so always make sure you use the correct thinner.
Masking and Detailing
Masking and detailing are essential for adding complex designs, patterns, and details to your diecast cars. Proper masking allows you to paint different areas of the model without overlapping colors. Detailing involves using fine brushes or airbrushes to add intricate details. Precision and patience are key to mastering these techniques. Whether you’re creating racing stripes, logos, or intricate graphics, mastering these techniques will take your models to the next level. Detailing takes a lot of practice, but the results are well worth the effort. With practice you will be producing stunning designs.
Masking Techniques for Complex Designs
Masking involves covering areas of the model you don’t want to be painted. Use masking tape specifically designed for painting models, as it adheres well and doesn’t leave residue. Cut the tape carefully to create clean lines and sharp edges. For complex designs, consider using pre-cut masking sets or liquid mask. Ensure the tape is firmly pressed down to prevent paint from bleeding under the edges. When removing the tape, do so slowly and carefully to avoid damaging the paint. For some designs, multiple layers of masking may be necessary. When done correctly, masking allows for the application of complex designs.
Detailing with Fine Lines
Detailing with fine lines involves using a fine-tipped brush or airbrush to add intricate details to your model. Use thinned paint and a steady hand to create crisp lines and precise details. Practice on a scrap piece of material before painting on your model. Consider using a magnifying glass to help you see the details more clearly. If you’re using an airbrush, use a fine nozzle and low air pressure. Take your time and work slowly. Detailing can take practice, but the results can dramatically improve the appearance of your diecast car. Furthermore, always be sure to clean your brush between colors to avoid cross contamination.
Clear Coating and Finishing Touches
The final step in airbrushing a diecast car is applying a clear coat and finishing touches. The clear coat protects the paint and adds a professional-looking finish. Finishing touches can include polishing, waxing, and adding decals. This step will protect the paint and make your models look their best. Properly applying the clear coat and adding finishing touches will add a lot to your project. This step is vital to protecting the paint from the elements.
Applying a Clear Coat
A clear coat protects the paint from scratches, UV damage, and other environmental factors. Apply the clear coat in thin, even coats, just like the base coat. Use a clear coat that is compatible with your paint. Allow each coat to dry completely before applying the next coat. You can choose from different finishes, such as gloss, satin, or matte, depending on the desired look. Applying a clear coat adds durability and enhances the overall appearance. The clear coat will protect the paint job for years to come.
Polishing and Waxing
After the clear coat has fully dried, you can polish and wax your diecast car to enhance its shine and protect the finish. Use fine-grit polishing compounds to remove any imperfections in the clear coat. Follow the polishing with a wax to add a layer of protection and shine. Apply the wax evenly and buff it to a high gloss. These finishing touches will give your diecast car a professional and showroom-quality appearance. Polishing and waxing can add a lot of shine to your paint job. Waxing is a great way to add a layer of protection.
Airbrushing diecast cars is a rewarding hobby that allows you to create stunning miniature works of art. By following these seven tips, from choosing the right paint to mastering airbrushing techniques, you can elevate your skills and achieve professional-quality results. Remember that practice, patience, and attention to detail are essential. Enjoy the process and have fun creating your own collection of beautifully painted diecast cars. The world of diecast cars is a great hobby!